Deploying to Episerver DXP - Part 2: Preproduction and Production, Deployment API
In the first part of this blog series, I set up build and deploy to the Integration environment in Episerver DXP using direct deploy to the Web App. In this part I will go through setting up deployment to Preproduction and Production using Azure DevOps and the Deployment API. I will use Epinova's DXP deployment extension.
Build pipeline for the master branch
The build pipline can be quite similar to the one where I deployed directly to the Integration environment, but the code package format has to be slightly different. That is why I use separate builds for Integration and Preproduction/Production.
I create a YAML file like this, and add it to source control.
trigger:
- master

pool:
  vmImage: 'windows-latest'

variables:
  solution: '**/*.sln'
  buildPlatform: 'Any CPU'
  buildConfiguration: 'Release'

steps:
- task: NuGetToolInstaller@1
  displayName: 'Install Nuget.exe'

- task: NuGetCommand@2
  displayName: 'NuGet restore'
  inputs:
    restoreSolution: '$(solution)'
    feedsToUse: 'config'
    nugetConfigPath: 'nuget.config'

- task: VSBuild@1
  displayName: 'Build solution'
  inputs:
    solution: '$(Solution)'
    platform: '$(BuildPlatform)'
    configuration: '$(BuildConfiguration)'
    maximumCpuCount: true
    msbuildArchitecture: x64
    msbuildArgs:
      /p:DeployOnBuild=True
      /p:WebPublishMethod=FileSystem
      /p:DeployDefaultTarget=WebPublish
      /p:SkipInvalidConfigurations=true
      /p:PublishProvider=FileSystem
      /p:LastUsedBuildConfiguration=Release
      /p:Configuration=Release
      /p:ExcludeApp_Data=False
      /p:publishUrl=$(System.DefaultWorkingDirectory)\wwwroot
      /p:DeleteExistingFiles=False
      /p:AutoParameterizationWebConfigConnectionStrings=false
      /p:MarkWebConfigAssistFilesAsExclude=False
      /p:VersionAssembly=$(Build.BuildNumber)

- task: VSTest@2
  displayName: 'Run unittests'
  inputs:
    platform: '$(buildPlatform)'
    configuration: '$(buildConfiguration)'

- task: ArchiveFiles@2
  displayName: 'Create NuGet package'
  inputs:
    rootFolderOrFile: '$(System.DefaultWorkingDirectory)\wwwroot'
    includeRootFolder: true
    archiveType: 'zip'
    archiveFile: '$(build.artifactStagingDirectory)\$(Build.Repository.Name).cms.app.$(Build.BuildNumber).nupkg'
    replaceExistingArchive: true

- publish: $(Build.ArtifactStagingDirectory)
  displayName: 'Publish artifact'
  artifact: drop
Then, to set up a build pipeline in Azure DevOps, Pipelines, select «New Pipeline».

Then, select where my source code is located. My source code is in Azure Repos.
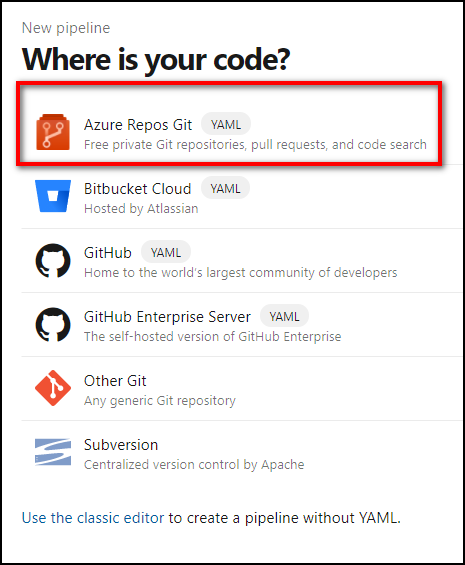
Select the repository, and then select «Existing Azure Pipelines YAML file».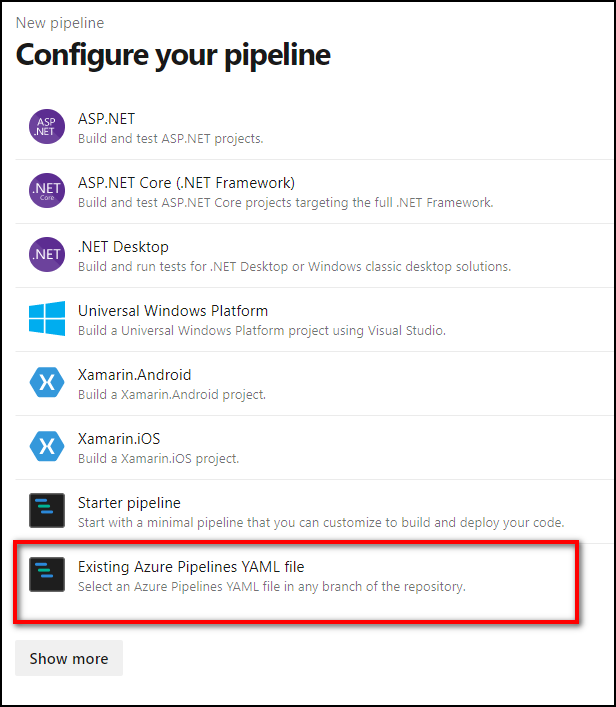
Then, select the YAML-file I added in the previous step, and run the pipeline.
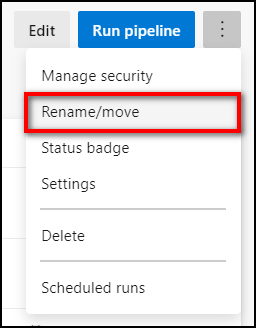
After the pipeline is created, I can rename the pipeline. The name is not part of the YAML file. I will call my build pipeline «Build for preproduction».
Prerequisites for deploy - variables
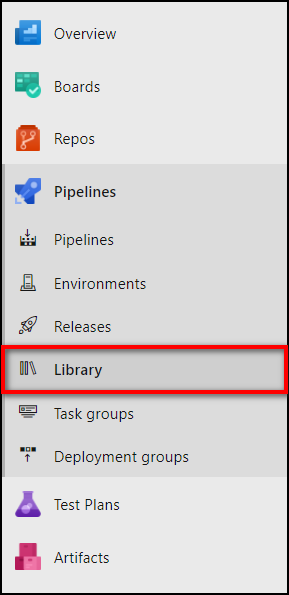
As I will be using Epinova's deployment extension, things will be easier if I set up a variable group with the exact same variable names as used by the tasks in this extension. Creating a variable group, also makes it possible to reuse variables across different pipelines.
In Azure Devops, I select the «Library» item.
Then click «+ Variable group».

I will name my variable group «DXP-variables» and make sure «Allow access to all pipelines» is enabled.

Then I will create the following variables:
- ClientKey
- ClientSecret
- DXP.ProjectId
- Integration.SlotUrl
- Integration.Url
- Integration.UrlSuffix
- Preproduction.SlotUrl
- Preproduction.Url
- Preproduction.UrlSuffix
- Production.SlotUrl
- Production.Url
- Production.UrlSuffix
- NuGetPackageNamePrefix
For information on how to locate the values for those properties, have a look at this blog post, and follow the instructions below the heading «Gather variable information». Ignore the other prerequisites for now.
Prerequisites for deploy - install Epinova DXP deployment extension
Install the extension from Visual Studio Marketplace, and dependent on your setup, your Organization's admin might have to approve the installation. After installing the extension, the tasks will be available for use.
Setting up deploy
I prefer setting up the deployment using the traditional UI with tasks, where I can click, edit, drag and drop and get a nice visual representation. It is also possible to define the deployment in YAML, but the support is still limited and I prefer the UI.
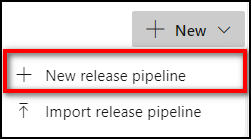
In Azure DevOps, select «Releases»:

Then click: «New release pipeline»:
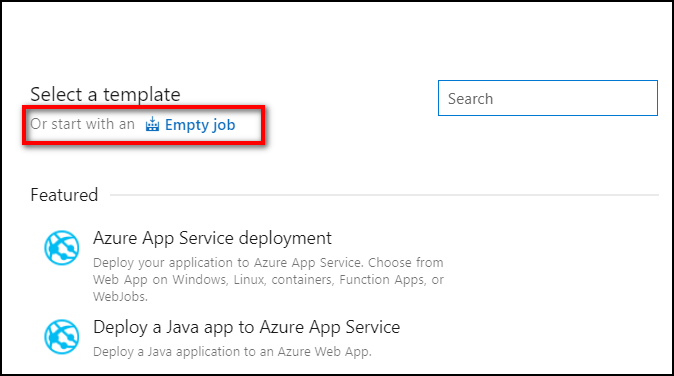
When I set up deploy to Integration, I used a template for Azure App Service deployment, but this time I will start with an empty job.
A stage will be added by default, let's rename it to «Preproduction». The name will have to match the name of your configuration transformation files for this stage.

Click «Add an artifact».
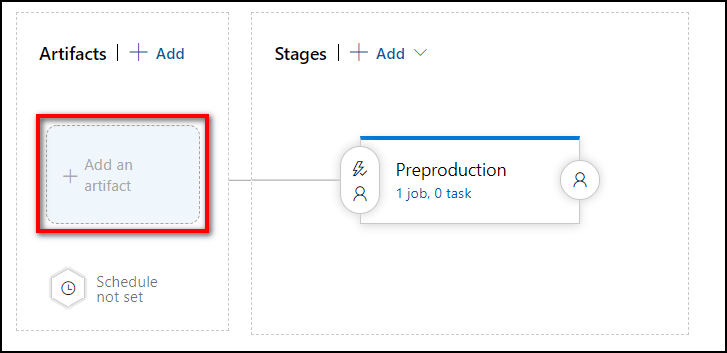
And select the artifact created by the build pipeline I created earlier.

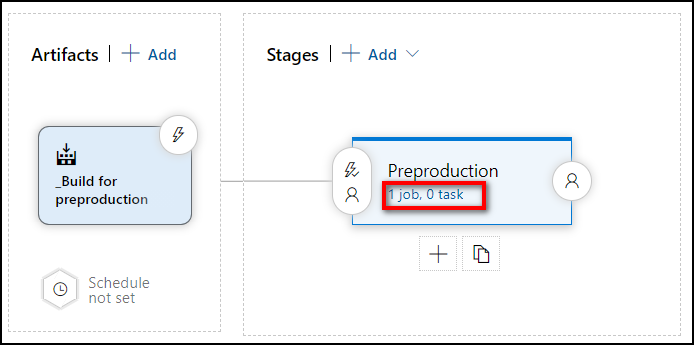
I will edit my pipeline's name. I will call mine «Preproduction / Production».

Then click «1 job, 0 task», to continue configuring my deployment pipeline.
I click the + button to start adding tasks to my job.
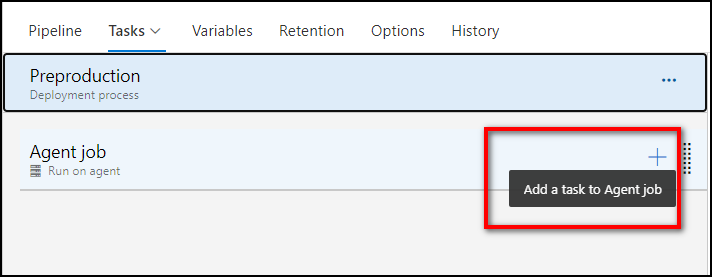
I will now have access to all DXP tasks from the Epinova deployment extension.
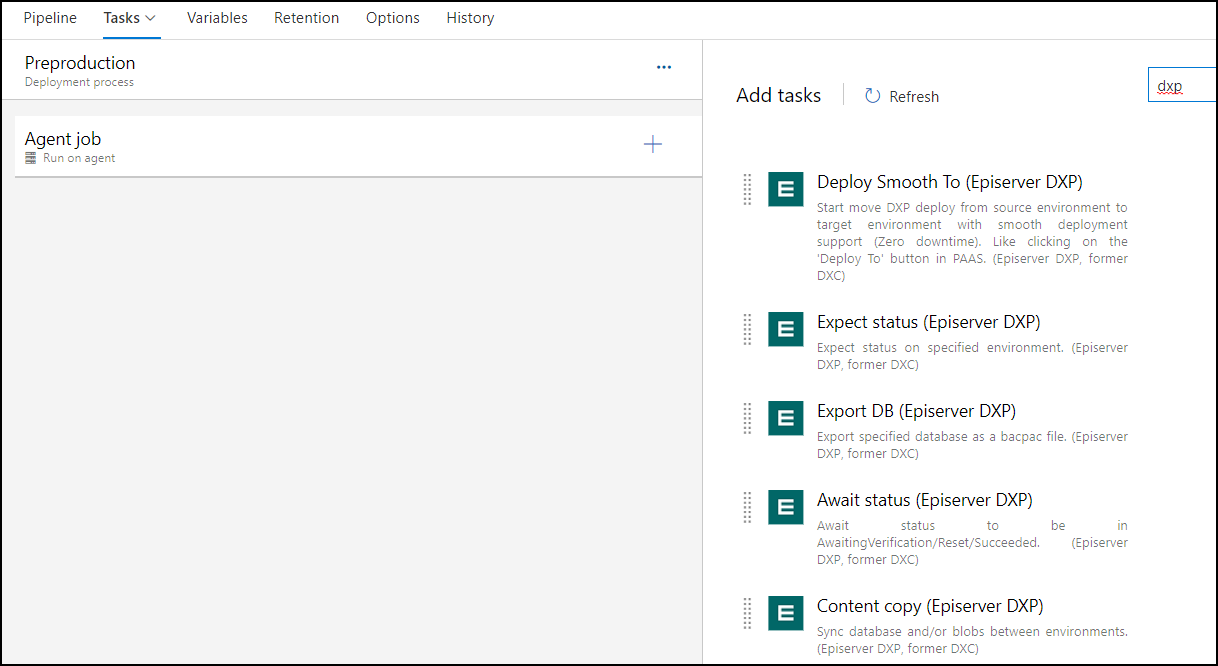
For my deployment to Preproduction, I use the following four tasks.
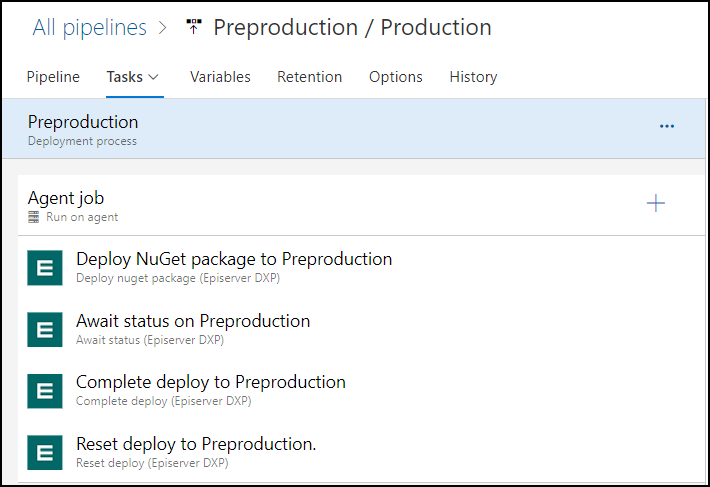
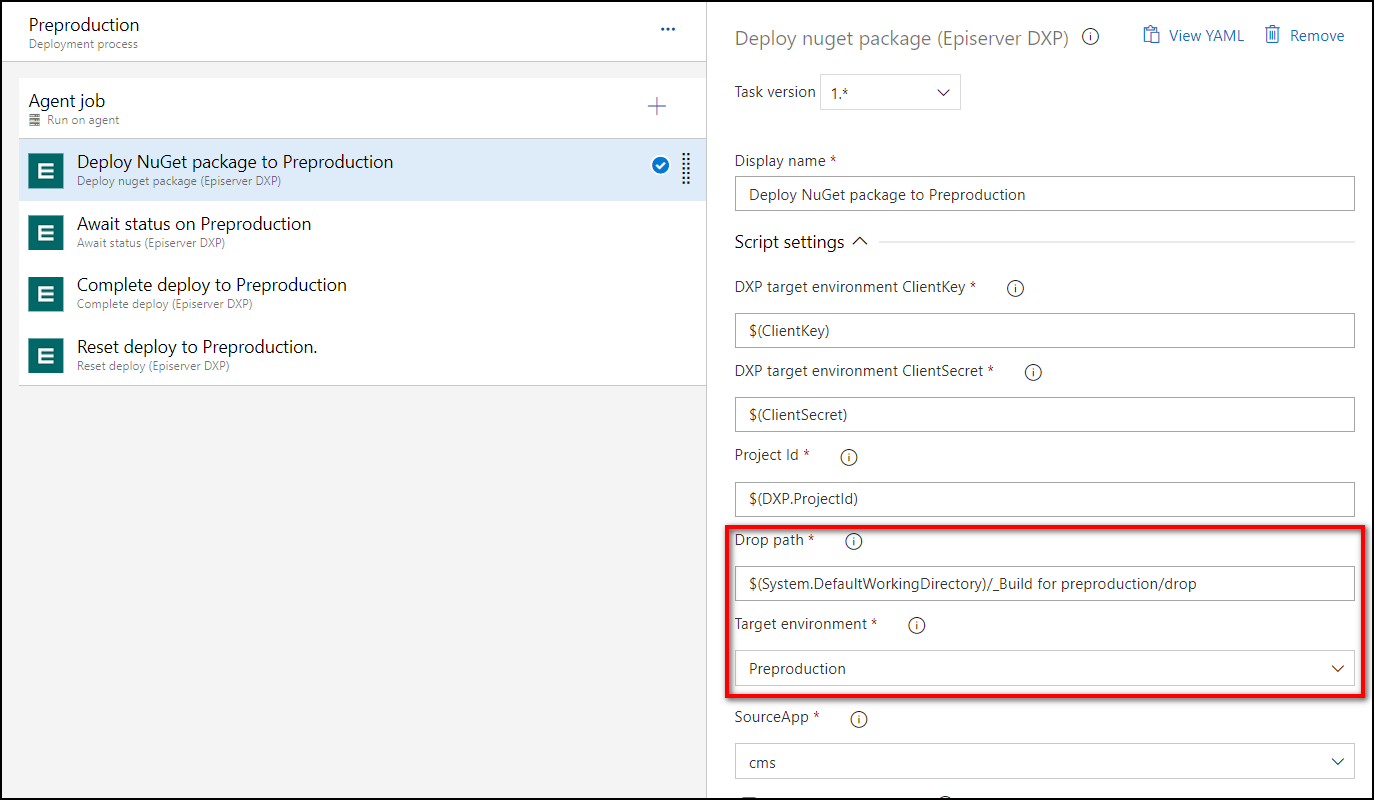
Deploy NuGet package to [environment]
This task will upload code package and deploy it to the slot of the selected DXP environment. Most values can be left at default, but update the two highlighted values. The drop path includes the name of your build.
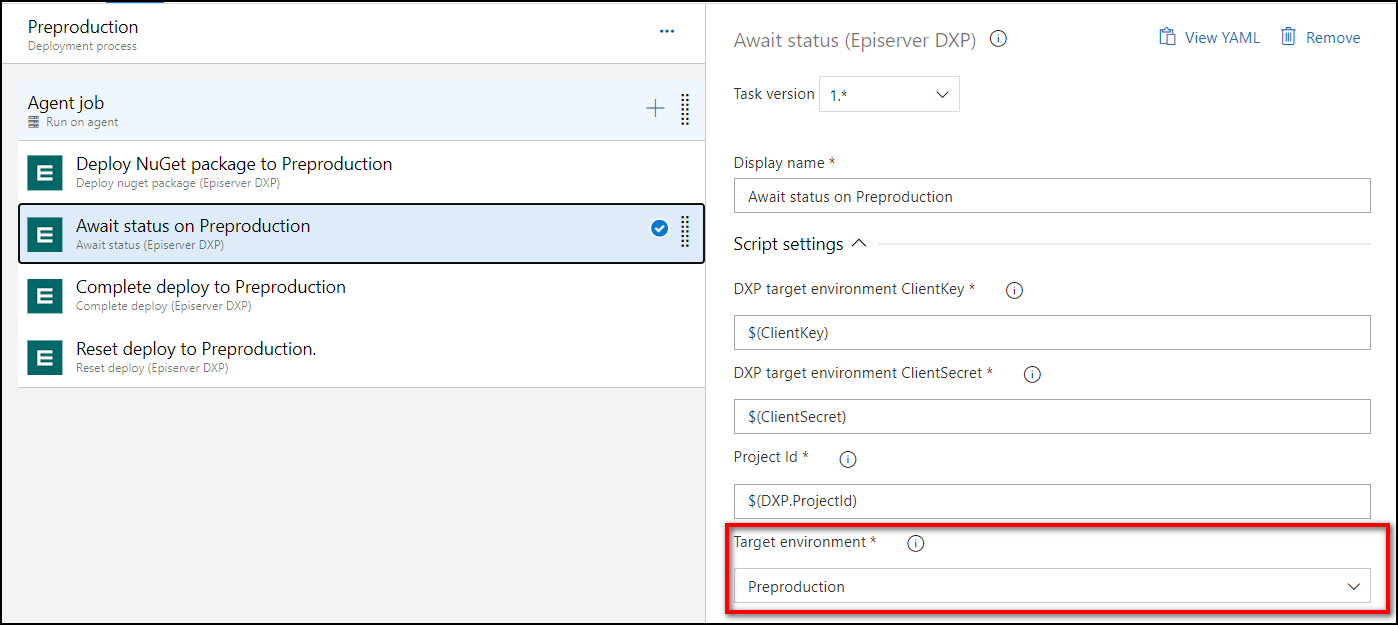
Await status on [environment]
This task will wait for the status of the DXP environment to be one of AwaitingVerification/Reset/Succeeded, then it will continue. Make sure to specify the environment, but leave the other properties at their default.
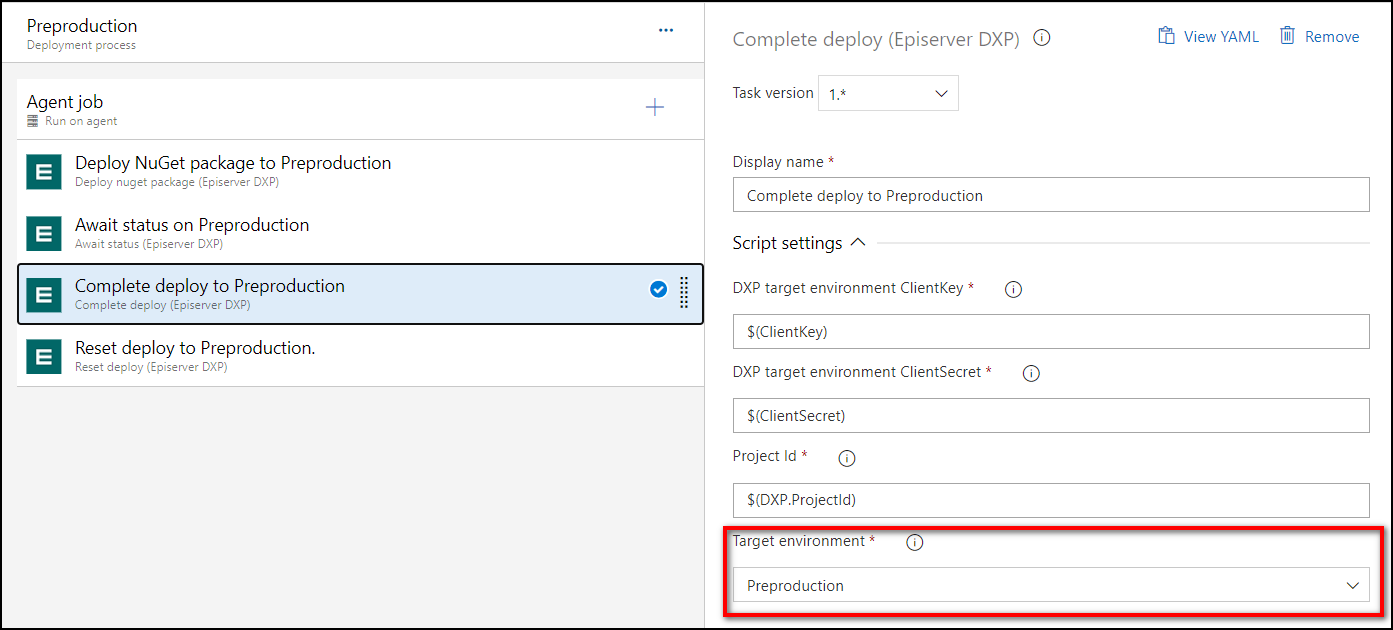
Complete deploy to [environment]
This task will complete the deployment, the same way as clicking the button «Complete deploy» in the PaaS portal. It will swap the slot containing your deployed code with production, and make your changes live. Complete deploy will only have an effect if the status is AwaitingVerification.
Update the environment, and leave the other properties at its default value.
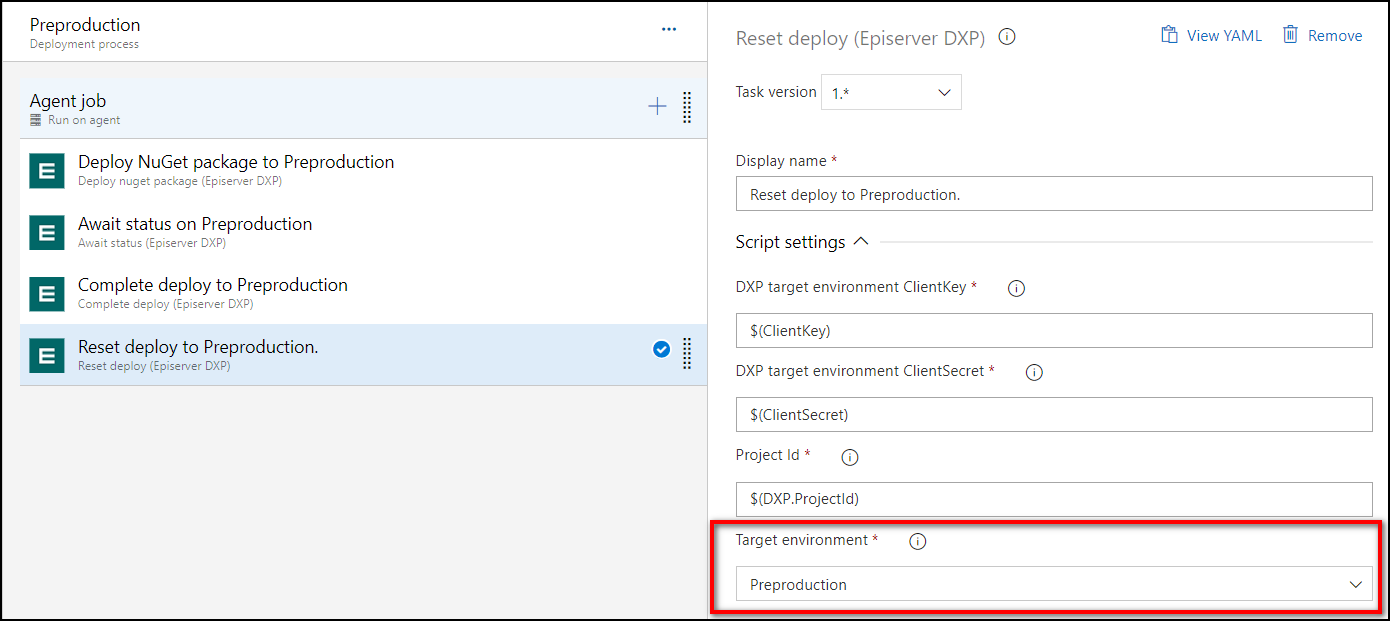
Reset deploy to [environment]
If the deployment this not finish successfully, this task will reset the deploy. If it did complete successfully, we can still run this task as it will only take effect if the status is still AwaitingVerification
Update the environment, and leave the other properties at its default value.
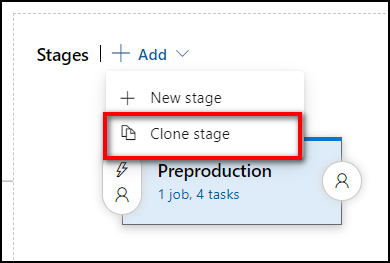
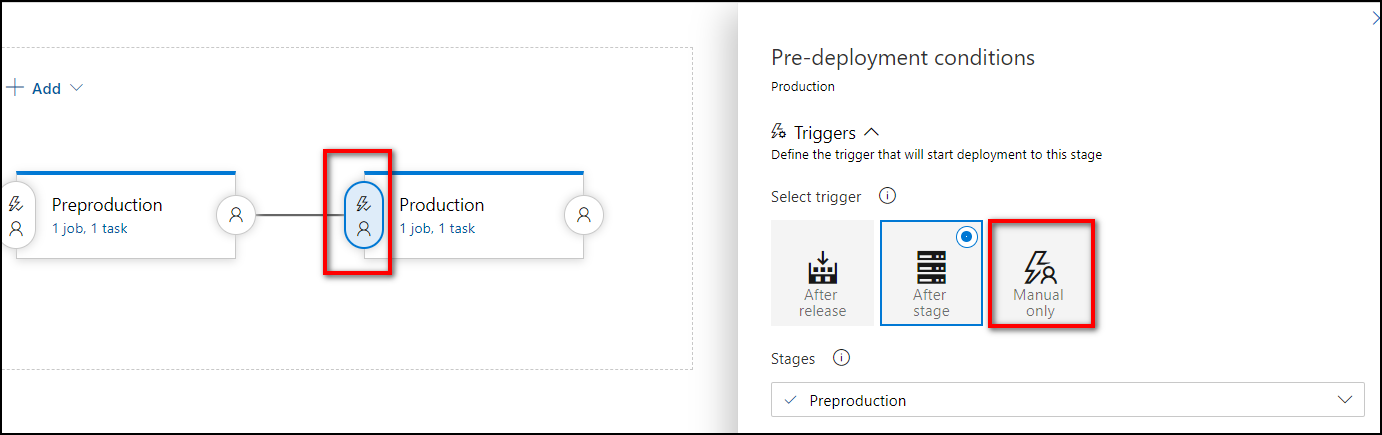
That was the setup of the deployment to Preproduction, now we will have to do the same for production. Start with cloning the Preproduction, select the Preproduction stage, and click «Clone stage».
Rename the clone to «Production», and then click «1 job, 4 tasks» and change the environment from «Preproduction» to «Production» for all four tasks.
I prefer to disable the pre-deployment condition, so I select «Manual only» like this:
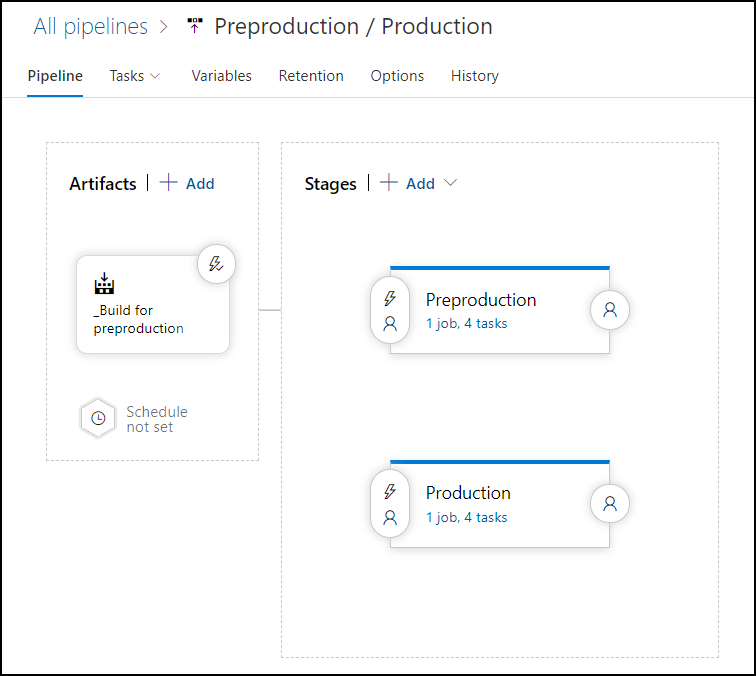
Then the final release pipeline should look like this:
I also like to enable the continuous deployment trigger like this.
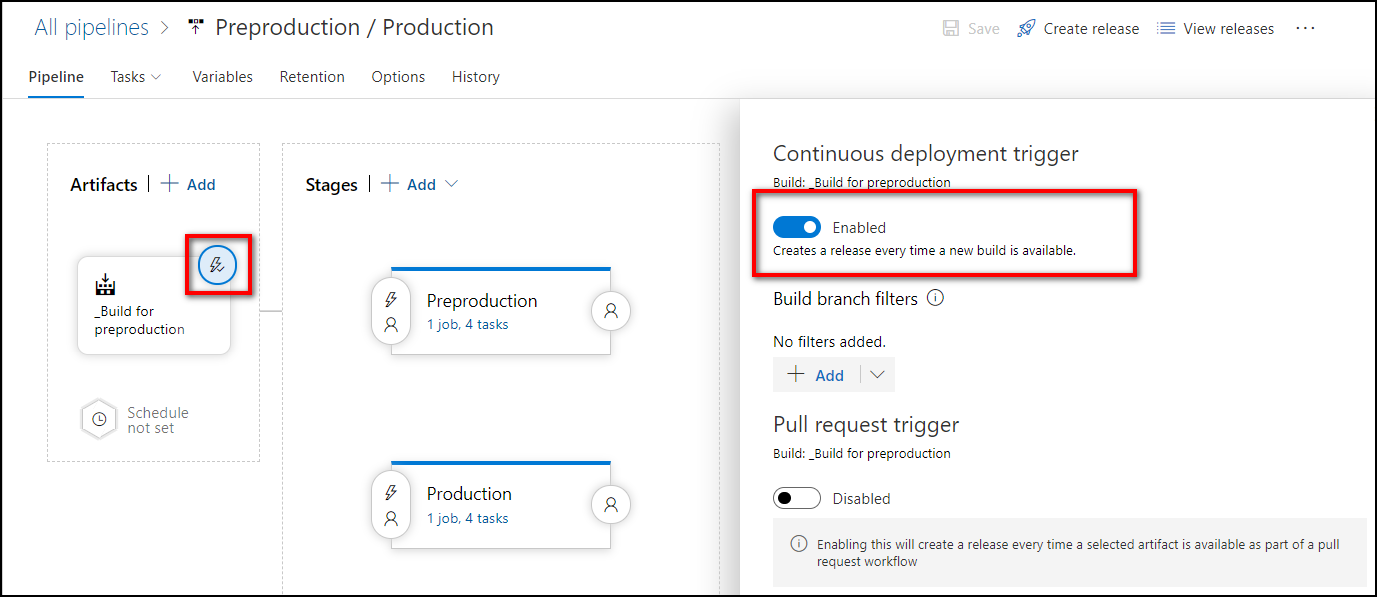
This way a new release will be created when the master branch is updated (because of the trigger at top of the YAML file), and I can choose to deploy it to Preproduction and/or Production.
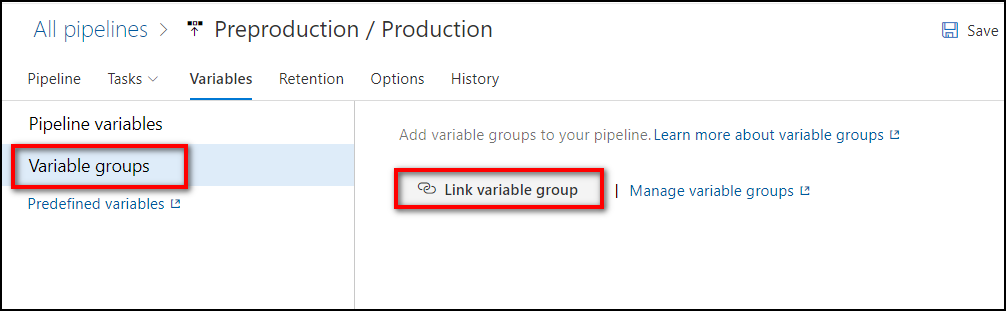
Access to the variable group
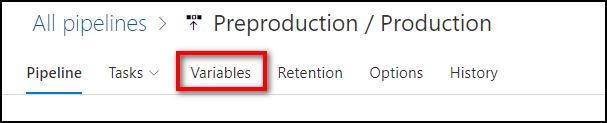
We need to grant the pipelines access to the variable group, that contains information about our DXP environment. While editing the pipeline, click «Variables».
Then click «Variable groups» and «Link variable group».
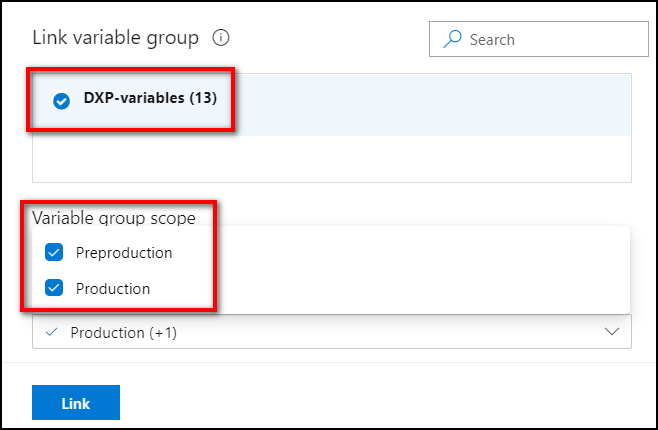
Finally, select the variable group «DXP-variables» and select both stages, Preproduction and Production. Then click «Link».
Deployment process
When the develop branch is updated, the code is built and automatically deployed to the Integration environment.
When the master branch is updated, the code is built, and a release is automatically created. I will then manually start the deployment. When the release is created, it will look like this.
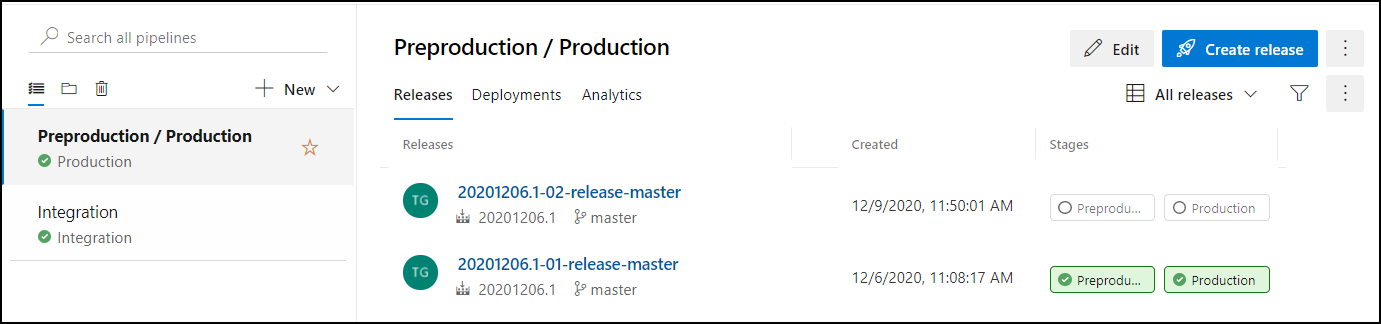
To start the deployment, click any of the stage names on the same line as the new release.

And then, click deploy.

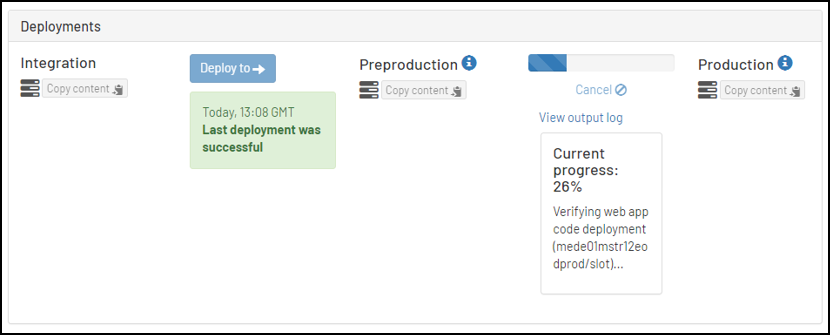
During the deployment, you can see live status and logs in the PaaS portal, like this.
Manual deployment in the PaaS portal
You can promote code from Integration to Preproduction, and from Preproduction to Production in the self-service (PaaS) portal. The documentation is on Episerver World. When using the self-service portal you can easily control things like if you want the maintenance page or not. The maintenance page is typically used when there is a change to the database schema.

Please note that when promoting code in the PaaS portal, the configuration transforms for the target environment is added to the configuration files after the transformations for the source environment is added. The way I have set up my deployment in Azure DevOps, with deployment directly to each environment only one transformation is applied. I will still write my configuration transforms so that both options will yield the same result.
Further reading
After I published this blog post, more people have written about DXP deployments.
- Andreas Huhta: Octopus Deploy and Episerver's deployment API - Quickstart guide
- Eric Markson: EpiServer DXP Deployment API - Smooth Deployment Beta
Final note
Deployment to Episerver DXP is a bit like Perl, and they could easily share the same motto; There's more than one way to do it.
This is my suggestion!