Episerver help texts, improved
Life as a web editor can be difficult. Some larger Episerver solutions may have more than 100 different page types, each of which has many tabs with tens of properties. Each property has a label, which is a short text that tells editors what the property are for, for example «Headline», «Main Image» or similar.
Sometimes, the label does not have room for all the information that editors should be presented with, and therefore, Episerver has added the option to display a tooltip, an additional description that appears at mouseover on the label. There are a couple of drawbacks to this solution. There is no visual marking that informs the editors of which properties have such tooltip text and which ones do not have. And since often very few properties have tooltip texts, it’s quite likely that the editors don’t see the ones that are added.
If Episerver can’t fix this for the better of their ediors, other developers will find ways.
- Alf Nilsson shows how to make the tooltip-text always visible, below the label.
- Ted+Gustaf demonstrates how a little Dojo magic can make a small icon indicate what properties have a tooltip available.
- Daved Artemik does about the same as Ted+Gustaf, but with pure CSS.
The fact that all these solutions exist, might indicate that Episerver could have done a better job theirself.
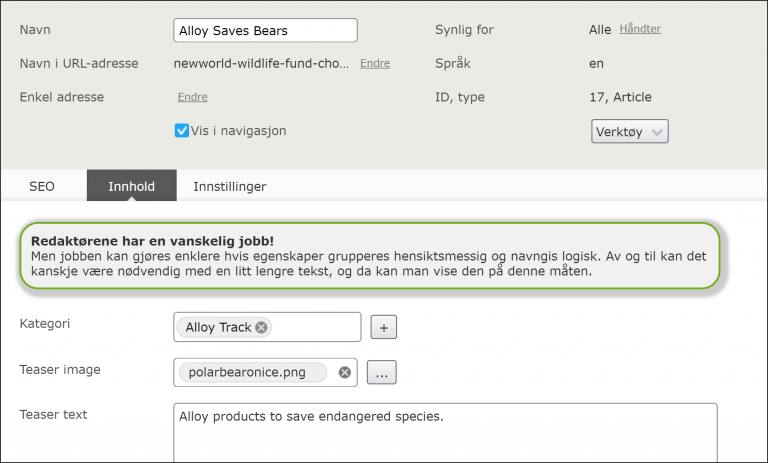
Sometimes we could benefit from a help text in edit mode, that is neither tied directly to a property nor placed next to a property. I came up with a quick solution, that shows a helptext like in the screenshot below. I’m not using the tooltip to a property the editors can edit, but simply change the apperance of a property whose only purpose is to display the help text. A kind of custom property. The property’s label are shown as a header, and the tooltip is shown in regular font below.
EditorDescriptor
EditorDescriptors is a concept introduced by Episerver in CMS7, and is a class defining how the client will display a property or a group of properties. With an EditorDescriptor we can choose what Dojo/Dijit widget (javascript file) that is responsible for rendering the property in edit mode.
using System;
using System.Collections.Generic;
using EPiServer.Shell.ObjectEditing.EditorDescriptors;
using EPiServer.Shell.ObjectEditing;

namespace Alloy.Business.EditorDescriptors
{
   [EditorDescriptorRegistration(TargetType = typeof(string),
      UIHint = "HelpText")]
   public class HelpTextEditorDescriptor : EditorDescriptor
   {
      public override void ModifyMetadata(ExtendedMetadata metadata,
         IEnumerable<Attribute> attributes)
      {
         ClientEditingClass = "alloy/editors/HelpText";
         metadata.EditorConfiguration.Add("title", metadata.DisplayName);
         metadata.DisplayName = "";
         base.ModifyMetadata(metadata, attributes);
      }
   }
}
The important thing here is TargetType that specifies which property type the EditorDescriptor applies to, UIHint which becomes the tag we can put as an attribute on selected properties to get the new rendering, and ClientEditingClass that specifies which javascript file defines how the property will be displayed in edit mode. In addition, we create a new title in EditorConfiguration so that the property’s display name becomes available to us from the javascript. Finally, we reset the built-in property for display name (metadata.DisplayName), to avoid displaying the default label with mouseover text. We want to display it (like title) so we have full control over markup.
On the code line defining ClientEditingClass, the segment alloy/ points to the folder /ClientResources/Scripts. To check what to use in your project, look in module.config for this definition.
<dojo>
   <paths>
      <add name="alloy" path="Scripts" />
   </paths>
</dojo>
Javascript
To specify exactly how the help text (property) are shown to the editor, we will have to add some javascript. In this case the javascript also includes some html. Here we position the value title (that we prepared in the EditorDescriptor) and the tooltip in markup, and also make use of a couple of CSS classes we’ll define later.
define([
        "dojo/_base/array",
        "dojo/_base/connect",
        "dojo/_base/declare",
        "dojo/_base/lang",

        "dijit/_CssStateMixin",
        "dijit/_Widget",
        "dijit/_TemplatedMixin",
        "dijit/_WidgetsInTemplateMixin",

        "epi/epi"
    ],
    function (
        array,
        connect,
        declare,
        lang,

        _CssStateMixin,
        _Widget,
        _TemplatedMixin,
        _WidgetsInTemplateMixin,

        epi
    ) {

        return declare("alloy.editors.HelpText",
                [_Widget,
                _TemplatedMixin,
                _WidgetsInTemplateMixin,
                _CssStateMixin], {

            templateString:
                "<div class=\"helptext shadow\">\
                         <strong data-dojo-attach-point=\"heading\"></strong>\
                         <div data-dojo-attach-point=\"description\"></div>\
                 </div>",

            postCreate: function () {
                this.inherited(arguments);
                this.heading.innerHTML = this.title;
                this.description.innerHTML = this.tooltip;
            }
        });
    });
CSS
To spice things up, we define the two CSS classes that we used in the Javascript file.
.helptext {
    width: 725px;
    border-radius: 20px;
    border: 2px solid #73AD21;
    padding: 10px;
    background-color: #f1f1f1;
    margin-bottom: 10px;
}

.shadow {
    -moz-box-shadow: 3px 3px 5px 6px #ccc;
    -webkit-box-shadow: 3px 3px 5px 6px #ccc;
    box-shadow: 3px 3px 5px 6px #ccc;
}
The CSS should be placed in a separate file, but in order to have Episerver load the CSS file in edit mode, we will have to register it in module.config.
<module>
   <clientResources>
      <add name="epi-cms.widgets.base"
         path="Styles/HelpText.css"
         resourceType="Style" />
   </clientResources>
</module>
Add the help text
All is set, now we just have to add the help text to the page types were we want them. The text on the screenshot in the top of this blog post were added like this. The heading was added as Name, and the more verbose text as Description. And of cource, we must remember the [UIHint("HelpText")].
public class ArticlePage : StandardPage
{
    [Display(Name = "Redaktørene har en vanskelig jobb!",
        Description = "Men jobben kan gjøres enklere hvis...")]
    [UIHint("HelpText")]
    public virtual string ExtraInformationAboutEditors { get; set; }
}
Support for language files
To add support for multiple languages, and enable updating of texts without compile and deploy, the texts could be added to a language xml file like this.
<standardpage>
        <properties>
            <extrainformationabouteditors>
                <caption>Translated caption</caption>
                <help>Translated description...</help>
            </extrainformationabouteditors>
        </properties>
</standardpage>
With the texts safely placed in the language file, we can omit them from the propery definition, and then this is all that is left.
public class ArticlePage : StandardPage
{
   [UIHint("HelpText")]
   public virtual string ExtraInformationAboutEditors { get; set; }
}
Finishing touches
The problem now is that the label gets its text from the language file at a later time than when the text is defined on the property definition. Because of this the label will be shown, even though we try to reset it in the EditorDescriptoren.

No matter how the texts are defined, in language file or property definition, we can hide the label with some CSS. Simply add this definition to the CSS file we created earlier.
label[for^="alloy_editors_HelpText_"] {
    display: none !important;
}
The CSS selector hides all labels that are label for anything that starts with (^=) alloy_editors_HelpText_, that must match ClientEditingClass defined in the EditorDescriptor. Just replace slash (/) with underscore(_).
The result
Now, we are finally able to add a heading + description at the top of tabs or between other properties, and the texts can be defined in either language files or directly in the property definition.