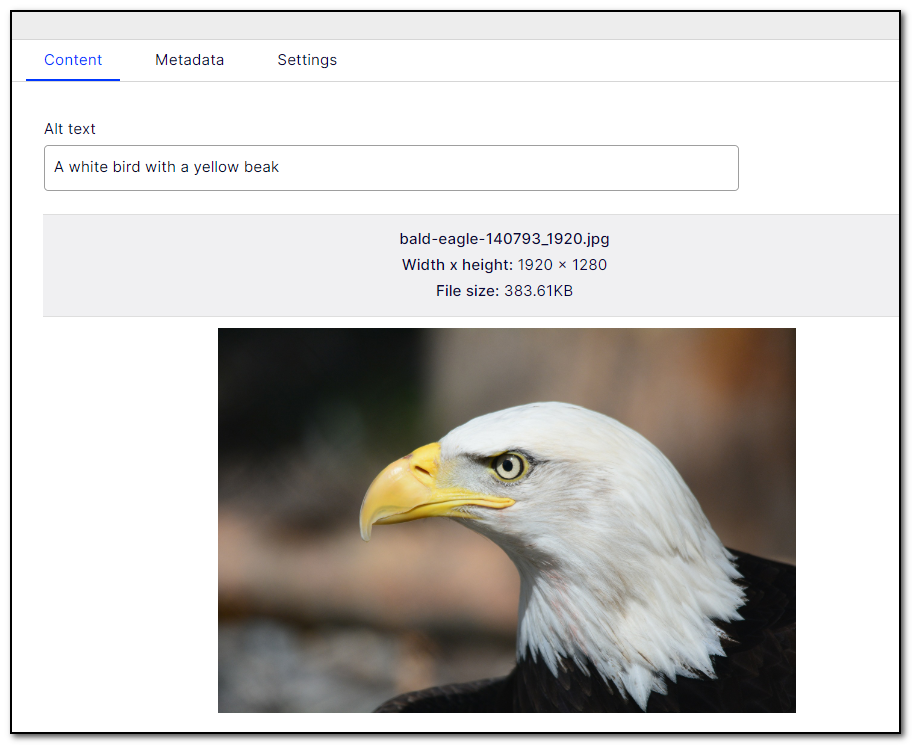
Image preview in Optimizely CMS12 all properties view
In Optimizely Content Cloud, properties may be added to Images. Images may be enriched with copyright information, descriptions, etc that are displayed together with the images on your website. Editing this kind of information would be more intuitive if we could see both the image and the properties at the same time! And why can’t we see how large the image is without downloading it? We can!
Four years ago, I wrote about how this could be done in Episerver CMS11, now with Optimizely CMS12, and .NET 6 (or even 7!) – it's time for an update!
Just some small changes, and we can have this:
One possible way, as it often is when trying to make Episerver more editor-friendly, is adding an EditorDescriptor. Figure out the details you want to present in All properties view, and populate metadata.EditorConfiguration with them. We will later use dojo to pick it up and display it to the user.
[EditorDescriptorRegistration(TargetType = typeof(string), UIHint = "imagepreview")]
public class ImagePreviewEditorDescriptor : EditorDescriptor
{
    public override void ModifyMetadata(ExtendedMetadata metadata,
       IEnumerable<Attribute> attributes)
    {
        var contentDataMetadata = metadata as ContentDataMetadata;
        if (!(contentDataMetadata?.OwnerContent is ImageFile imageFile))
        {
            base.ModifyMetadata(metadata, attributes);
            return;
        }

        ClientEditingClass = "gulla/editors/ImagePreview";

        // File name
        metadata.EditorConfiguration.Add("fileName", imageFile.RouteSegment);

        // Url
        var urlResolver = ServiceLocator.Current.GetInstance<IUrlResolver>();
        var url = urlResolver.GetUrl(imageFile.ContentLink);
        metadata.EditorConfiguration.Add("fileUrl", url);


        int width = 0;
        int height = 0;
        string fileSize = "";
        string errorMessage = "";
        using (var stream = imageFile.BinaryData.OpenRead())
        {
            // File size
            fileSize = ((int)stream.Length).ToFileSize();

            // Image dimensions
            try
            {
                var image = SixLabors.ImageSharp.Image.Load(stream);
                width = image.Width;
                height = image.Height;
                image.Dispose();
            }
            catch (Exception )
            {
                errorMessage = "Unable to process image data.";
            }
        }

        // File size
        metadata.EditorConfiguration.Add("fileSize", fileSize);

        // Image dimensions
        metadata.EditorConfiguration.Add("fileDimensions", $"{width} x {height}");

        if (!string.IsNullOrWhiteSpace(errorMessage))
        {
            metadata.EditorConfiguration.Add("fileErrorMessage", errorMessage);
        }

        metadata.DisplayName = "";
        base.ModifyMetadata(metadata, attributes);
    }
}
The only difference from CMS 11, is that I'm using SixLabors.ImageSharp instead of System.Drawing to get the image details. Optimizely Content Cloud uses the same library under the hood. If your code will be running on Windows only, you may choose to still use System.Drawing.
The ClientEditingClass points to a JavaScript file we will create next. In my example, gulla will have to match the name parameter of the configuration in module.config:
<dojoModules>
  <add name="gulla" path="Scripts" />
</dojoModules>

<dojo>
  <paths>
    <add name="gulla" path="Scripts" />
  </paths>
</dojo>
And then some JavaScript placed in the folder /wwwroot/ClientResources/Script/Editors:
define([
   "dojo/_base/declare",
   "dijit/_CssStateMixin",
   "dijit/_Widget",
   "dijit/_TemplatedMixin",
   "dijit/_WidgetsInTemplateMixin"
],
   function(
      declare,
      _CssStateMixin,
      _Widget,
      _TemplatedMixin,
      _WidgetsInTemplateMixin
   ) {
      return declare("alloy.editors.ImagePreview",
         [_Widget, _TemplatedMixin, _WidgetsInTemplateMixin, _CssStateMixin], {
         templateString:
            "<div>\
               <div class=\"imagePreviewHeading\">\
                  <strong data-dojo-attach-point=\"imageName\"></strong><br>\
                  <strong>Width x height:</strong> <span data-dojo-attach-point=\"imageFileDimensions\"></span><br>\
                  <strong>File size:</strong> <span data-dojo-attach-point=\"imageFileSize\"></span><br>\
                  <strong data-dojo-attach-point=\"errorMessage\"></strong>\
               </div>\
               <div class=\"imagePreview\" data-dojo-attach-point=\"imageContainer\"></div>\
            </div>",

         postCreate: function() {
             this.inherited(arguments);
             this.imageName.innerHTML = this.fileName;
             this.imageFileDimensions.innerHTML = this.fileDimensions;
             this.imageFileSize.innerHTML = this.fileSize;

             if (typeof this.fileErrorMessage !== "undefined") {
                 this.errorMessage.innerHTML = this.fileErrorMessage;
                 this.errorMessage.style = "display: inline-block; margin-top: 10px; color: red;";
             }
             else {
                 this.errorMessage.style = "display: none;";
             }
             this.imageContainer.style = "background-image: url('" + this.fileUrl + "');";
             this.imageContainer.style.backgroundImage = "url('" + this.fileUrl + "');";
         }
      });
   });
Then, finally, some CSS placed in /wwwroot/ClientResources/Styles/ImagePreview.css
.imagePreviewHeading {
	margin: 0 -20px;
	margin-right: -16px;
	padding: 10px;
	text-align: center;
	background-color: #f0f0f2;
	border: 1px #dedede solid;
}

.imagePreview {
	height: 350px;
	padding-top: 10px;
	background-origin: content-box;
	background-position: center;
	background-repeat: no-repeat;
	background-size: contain;
}
The CSS file does not get loaded until we add this to our beloved module.config:
<clientResources>
   <add name="epi-cms.widgets.base" path="Styles/ImagePreview.css" resourceType="Style" />
</clientResources>
Then finally, you may place the preview wherever you like, just place a property with a matching UIHint.
[UIHint("imagepreview")]
public virtual string ImagePreview { get; set; }
That's it!